
Print & design
QR code print size, resolution and quiet zones
Choose a QR print size based on module density, viewing distance and real print tests—not a universal minimum.
Ultimate QR ·
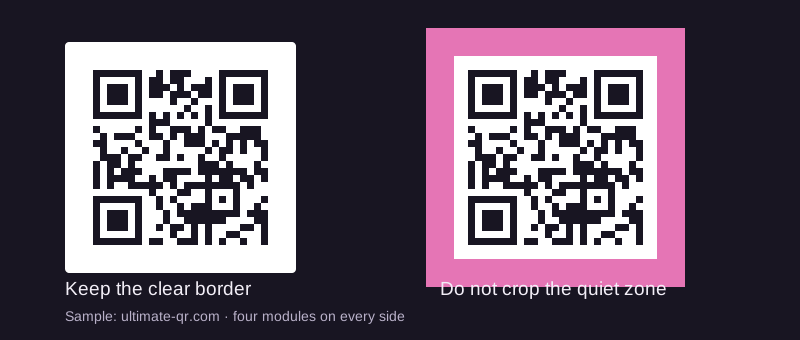
The short answer
There is no universal minimum QR print size. Keep the four-module quiet zone intact, give each small square enough printed detail, and test the final file at its actual size and scan distance.
Start with modules, not a centimetre rule
The tiny squares that make up a QR code are called modules. The more information a code needs to store, the more modules it may need. A long website address, a detailed contact card and a short link can therefore produce different densities even when all three images are exported at the same width.
Printing each image at two centimetres does not give each module the same physical size. DENSO WAVE advises choosing module size with the printer and reading equipment in mind, and making modules as large as the available space permits. Treat fixed minimum-size claims as starting suggestions, not guarantees for your specific code.
Start with the space available on the actual item. A card held near a phone and a poster viewed across a corridor are different jobs. If your destination is an unnecessarily long URL, remove only parameters you genuinely do not need; never shorten away required access tokens or campaign identifiers without understanding their purpose.
Reserve the quiet zone before adding decoration
A standard QR Code needs a clear border four modules wide on all sides. This quiet zone is part of the required layout, not wasted space for a designer to fill. Keep nearby text, frames, logos and a busy photo background outside it.
A transparent export still needs a suitable clear area when placed on your artwork. Dropping it onto patterned packaging can remove the effective quiet zone even though the exported file looked correct. Review the complete artwork, not just the QR image in isolation.
Match the export to the print workflow
PNG is a raster image: it has a fixed number of pixels. Enlarging it far beyond that size can blur module edges. SVG describes shapes and can be resized without that same raster limitation, though a printing application can still rasterize it or alter the final output. Ask your printer which format they accept.
As a file-preparation example, a 600-pixel image placed at two inches has 300 pixels per inch. That arithmetic describes image resolution, not a scanning guarantee. Payload density, contrast, material and printer quality still matter. Do not rely on a crisp on-screen image to prove a small print will work.
| Placement | What to inspect | Test before production |
|---|---|---|
| Business card | Readable modules and an untrimmed border | Actual-size proof in normal hand-held use |
| Table menu | Glare, cleaning damage and nearby text | Proof on the intended stand or surface |
| Poster | Size at the intended approach distance | A mounted proof from several positions |
A practical print-proof checklist
Use Ultimate QR to create the intended destination, choose a restrained design and export your file. Free PNG downloads are available; the signed-in free allowance includes one SVG export per browser. Pro adds ongoing vector exports and PNG resolutions above 1000 pixels. Choosing a paid format does not replace physical testing.
Print one proof using the same dimensions and material as the final run. If the code is hard to detect, enlarge it or simplify the design rather than adding more decoration. Keep the approved source file so later print runs do not use a screenshot or a recompressed copy.
- Scan with more than one phone at the intended distance.
- Test ordinary lighting and any glossy surface glare.
- Check the destination opens and the final page is usable.
- Confirm the cutter, fold or frame cannot remove the border.
- Repeat after changing the URL, logo, colours or print dimensions.
Sources & further reading
General technical guidance is informed by these sources. Ultimate QR feature descriptions refer to this service, not to every QR provider. Report a correction or read our publishing standards.